


The Complex Data Table Markup Toolbar is an add-on to FireFox which can be used to:
- Reveal 'headers' and 'id' complex data table markup
- Generate 'headers and 'id' markup automatically or manually
- Create a text version of the data table
Download Complex Data Table Markup Toolbar - updated 19 December 2017
What is the Complex Data Table Markup Toolbar?
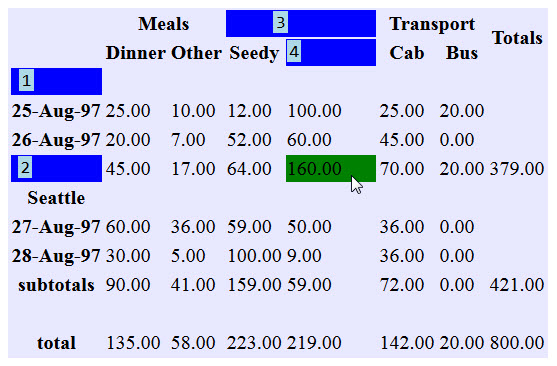
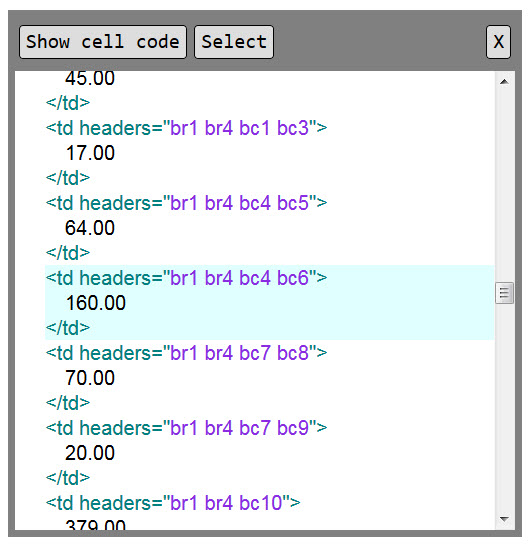
The Toolbar enables you to quickly markup complex data tables. When a cell is hovered over using the toolbar the associated header cells are highlighted and the code of the cell is highlighted in the code window, revealing the generated complex markup.
Toolbar functions
| Icon | Command |
|---|---|
| Open toolbar | |
| Generate complex markup | |
| Header cells - make highlighted cells header cells | |
| Data cells - make highlighted cells data cells | |
| Associate highlighted cells with double-clicked header cell | |
| Unassociate highlighted cells with all header cells | |
| Unselect table and remove toolbar styling | |
| View code | |
| Disable CSS and show cell borders | |
| Text version of table | |
| Help (new window) |
Using the Toolbar
- Open toolbar by clicking the main icon
- Click a data table. This applies a light blue outline to the table and enables you to explore the markup (by hovering the cursor over cells) and to execute commands on the table
Data cells are shown as green and header cells are shown as blue on mouse hover. Header cells associated with the current cell are shown in blue with numbers indicating their order in the "headers" attribute of the current cell.
Cells can be highlighted by hovering over the first cell, pressing the Control key, moving the cursor to the last cell and releasing the Control key (no need to drag the mouse - just hover). Highlighted cells are indicated with a gray colour.
When working with tables that already contain colours or background images, it can be difficult to see the highlights which the toolbar create. Clicking the "Disable CSS" button disables all existing CSS and can help to see the highlighting created by the toolbar.
Automatic Mark Up
Select a table by clicking it, then run the "Generate" command to create complex table markup and header cells from scratch. This creates complex table markup for neatly structured tables as in the example below. Note that an empty row needs to be inserted before the "Totals" row to ensure that "Totals" is not a sub-header of "Seattle".
| Meals | Hotels | Transport | Totals | ||||
|---|---|---|---|---|---|---|---|
| Dinner | Other | Seedy | Upmarket | Cab | Bus | ||
| San Jose | |||||||
| 25-Aug-97 | 25.00 | 10.00 | 12.00 | 100.00 | 25.00 | 20.00 | |
| 26-Aug-97 | 20.00 | 7.00 | 52.00 | 60.00 | 45.00 | 0.00 | |
| subtotals | 45.00 | 17.00 | 64.00 | 160.00 | 70.00 | 20.00 | 379.00 |
| Seattle | |||||||
| 27-Aug-97 | 60.00 | 36.00 | 59.00 | 50.00 | 36.00 | 0.00 | |
| 28-Aug-97 | 30.00 | 5.00 | 100.00 | 9.00 | 36.00 | 0.00 | |
| subtotals | 90.00 | 41.00 | 159.00 | 59.00 | 72.00 | 0.00 | 421.00 |
| total | 135.00 | 58.00 | 223.00 | 219.00 | 142.00 | 20.00 | 800.00 |
The table below is included to demonstrate how the automatic markup handles several levels of row and column header cells: Install the toolbar on your Firefox, open the toolbar, click the table and hover the mouse over it to see which cells are data cells (green) and which are header cells (blue). Click "Generate" to generate the complex mark up and hover the mouse over cells to view associated header cells. The table code can be inspected by clicking "View code" to open the code dialog.
| Location | Time | Animal | ||||||||
|---|---|---|---|---|---|---|---|---|---|---|
| Year | Season | Mammal | Reptile | |||||||
| Large | Small | Large | Small | |||||||
| Whales | Bears | Anteaters | Mice | Alligators | Crocodiles | Snakes | Turtles | |||
| Oceania | ||||||||||
| Australia |
2005 |
Summer | 155 | 155 | 155 | 155 | 155 | 155 | 155 | 155 |
| Winter | 155 | 155 | 155 | 155 | 155 | 155 | 155 | 155 | ||
| 2004 | Summer | 155 | 155 | 155 | 155 | 155 | 155 | 155 | 155 | |
| Winter | 155 | 155 | 155 | 395 | 155 | 155 | 155 | 155 | ||
| Europe | ||||||||||
| Iceland | 2005 | Summer | 155 | 155 | 155 | 155 | 155 | 155 | 155 | 155 |
| Winter | 155 | 155 | 155 | 155 | 155 | 155 | 155 | 155 | ||
| 2004 | Summer | 155 | 155 | 155 | 155 | 155 | 155 | 155 | 155 | |
| Winter | 155 | 155 | 155 | 155 | 155 | 155 | 155 | 155 | ||
Note that the automatic markup function only produces the correct result for tables that are structured in a similar way to the above tables. For tables which are structured differently, the manual markup functions can be used.
Manual Markup
Creating Header Cells or Data Cells
Highlight cells then run the "Header cells" command to create header cells or run the "Data cells" command to create data cells.
Associating Cells with a Header Cell
Highlight cells, select a header cell by double-clicking it, then run the "Associate" command.
This places the id of the header cell in the "headers" attribute of the cells (attributes are created if they do not already exist). It also places the contents of header cell's own "headers" attribute (if any) in the "headers" attribute of the cells.
This means that associations transfer, for example: if header cell A is header for header cell B and header cell B is made header for data cell D, then both header cell A and B will be headers for data cell D (the id of both header cells will be in the "headers" attribute of the data cell).
Clearing Associations of Cells
Highlight cells, then run the "Unassociate" command. This removes all "headers", "scope" and "axis" attributes from the cells.
Viewing and Saving Code
Run the "View code" command to view the generated code for the current table.
To save the generated code for the whole page (when all tables have been marked up):
- Run the "Unselect" command to remove the light blue outline and other toolbar styles from the current table
- Press F12 to open a code inspector and copy the table code. Alternatively, open the code window from the toolbar, click "Select" and copy the selection
Creating a Text Version
Even when a data table is correctly marked up, there is no guarantee that all screen reader software will be able to correctly interpret the table. Providing a text version of the table content in addition to the marked up table ensures that screen reader users can can access the table data and table header cells in a format which does not depend on any table markup. This is done by using headings (<h1>, <h2>, <h3> and <h4> elements).
To create a linear version of a table, select the table, create headers cells and complex markup either automatically or manually, check that the markup is correct, then run the "Text version" command.
The following example shows part of the the text version (first 3 rows containing data cells) of the first example table. Note that the header cells are listed in reverse order to ensure that header cells which change from row to row and from column to column are first in the listing. This makes it easier for screen reader users as the important information (the information which is specific to a row or column) is announced first.
25-Aug-97, San Jose. Row 1
Dinner, Meals.Cell 1
27.00
Other, Meals.Cell 2
10.00
Seedy, Hotels.Cell 3
12.00
Upmarket, Hotels. Cell 4
100.00
Cab, Transport.Cell 5
25.00
Bus, Transport. Cell 6
20.00
26-Aug-97, San Jose. Row 2
Dinner, Meals. Cell 1
20.00
Other, Meals. Cell 2
7.00
Seedy, Hotels. Cell 3
52.00
Upmarket, Hotels. Cell 4
60.00
Cab, Transport. Cell 5
45.00
Bus, Transport. Cell 6
0.00
subtotals, San Jose. Row 3
Dinner, Meals. Cell 1
45.00
Other, Meals. Cell 2
17.00
Seedy, Hotels. Cell 3
64.00
Upmarket, Hotels. Cell 4
160.00
Cab, Transport. Cell 5
70.00
Bus, Transport. Cell 6
20.00
Totals. Cell 7
379.00
Algorithm for Automatic Mark Up
The algorithm works in principle like this for the first example table:
- An empty cell contains only white space
- An empty row consists of empty cells only
- A super row header is a row in witch the left-most cell is non-empty and all other cells empty (this includes a non-empty cell spanning the entire row)
First Column
Algo starts at top of column 1 and goes downwards, stopping at the first non-empty cell:
- If the cell is a super row header, the cell is made header for all cells below, until a super row header or an empty row is encountered
- If the cell is not a super row header, it is made header cell for the entire column if other header cells exist in the same row. If no header cells exist in the same row, the cell is made header cell for the current row only
For the remaining cells: super row headers are made headers for all cells below until next super row header or empty row. non-super row headers are made headers for their row only.
Remaining Columns
Non-empty cells in the top row are made column headers. If a cell spans multiple columns, the cells below are made column headers as well.
Terms of Use
Developed by Pierre Frederiksen. Pierre is a Principal Technical Consultant at Vision Australia
This software is being provided "as is", without any express or implied warranty. In particular, Vision Australia does not make any representation or warranty of any kind concerning the reliability, quality, or merchantability of this software or its fitness for any particular purpose. additionally, Vision Australia does not guarantee that use of this software will ensure the accessibility of your web content or that your web content will comply with any specific web accessibility standard.

This work is licensed under a Creative Commons License